Ready to add a zesty touch to your home? Our crochet lemon pattern guide will help you create an adorable citrus decoration in no time. This fun project is perfect for crocheters of all skill levels, from beginners to seasoned crafters.
With this pattern, you’ll craft a charming lemon that measures 4.8 inches in both height and width. You’ll use worsted weight yarn in four vibrant colors to bring your citrus creation to life. The pattern requires less than 1 oz of yarn, making it a quick and economical project.
Using a 2.5 mm crochet hook, you’ll work through 19 rounds for the lemon and 2 rounds for the leaf. The pattern includes easy-to-follow instructions for creating the lemon’s round shape and adding a realistic leaf detail.
Whether you’re looking to brighten up your kitchen or create a unique gift, this crochet lemon pattern is sure to delight. Get ready to dive into a world of crafty citrus fun!
Essential Materials and Tools for Your Citrus Creation
Are you ready to crochet a cute lemon? First, let’s get the materials you need. The right yarn is key for that perfect citrus look.
Yarn Selection and Color Choices
Choose worsted weight yarn in sunny yellow for the lemon body. Use lime green for the leaf. These colors will make your lemon look fresh and real. Cotton yarn is good for practice and kitchen items.
Required Crochet Hooks and Notions
Get a G6 (4.00 mm) crochet hook for this project. You’ll also need stuffing for the lemon’s shape. And don’t forget a yarn needle for the final touches.
| Item | Specification | Purpose |
|---|---|---|
| Yellow Yarn | Worsted Weight | Lemon Body |
| Green Yarn | Worsted Weight | Leaf Detail |
| Crochet Hook | G6 (4.00 mm) | Main Tool |
| Stuffing | Polyester Fiberfill | Shaping |
| Yarn Needle | Large Eye | Finishing |
Optional Decorative Elements
For extra charm, use safety eyes and black embroidery floss for a face. Small beads or sequins can make your lemon sparkle.
Now that you have your materials, you’re ready to start. The lemon peel stitch will give your lemon a textured look. It’s perfect for your citrus project.
Skill Level and Techniques Overview

This crochet lemon pattern is great for those wanting to improve their amigurumi skills. It’s aimed at intermediate crocheters who know basic stitches. You’ll need to know single crochet (sc), increases (inc), and decreases (dec) to make this cute citrus decoration.
Working in rounds is essential for this project. You start with a magic ring and build your lemon over 19 rounds. The pattern includes color work, like adding a leaf detail over two rounds. It’s a great way to practice and build your confidence.
Here’s a breakdown of the essential crochet techniques you’ll use:
- Magic ring start
- Single crochet (sc)
- Increases (inc)
- Decreases (dec) – specific sc2tog
- Color changes
- Chain 1 picot stitch for leaf detail
The pattern uses US crochet terms and a 2.5 mm hook. You’ll need three yarn colors: yellow for the lemon body, and light and dark green for the leaf. While it doesn’t specify a gauge, your tension will impact the size. Remember, practice is key to mastering these amigurumi skills!
Getting Started: Basic Stitch Instructions
Ready to start your crochet lemon journey? Let’s dive into the essential crochet stitches and techniques you’ll need. This pattern has a middle difficulty level, perfect for both beginners and experienced crocheters.
Magic Ring Technique
The magic ring technique is key for a tight center, perfect for your lemon’s rounded shape. It eliminates gaps and gives your work a polished look. If you’re new to this technique, don’t worry – practice makes perfect!
Single Crochet Foundation
Single crochet (sc) forms the backbone of your lemon. You’ll use this stitch a lot, with 30 sc stitches in Rounds 7-13. The pattern includes 19 rounds for the lemon body, so mastering this stitch is key.

Increase and Decrease Methods
Shaping your lemon requires increasing and decreasing stitches. You’ll use the single crochet two together (sc2tog) decrease in Rounds 14-17. For the leaf, you’ll start with a 24-stitch chain and incorporate special stitches like the picot for added texture.
Remember, your crochet tension affects the final size. Use a 2.5 mm hook for best results. With these basic crochet stitches and the magic ring technique under your belt, you’re all set to create a cute citrus decoration!
Crochet Lemon Pattern: Step-by-Step Guide
Ready to make a zesty crochet lemon? This guide will show you how. Use a 4.00mm (G) hook and medium weight yellow yarn. Let’s start!
Begin with a magic ring and make 6 single crochet stitches in it. This is the lemon’s base. In the next rounds, you’ll add stitches to shape the fruit. By round 5, you’ll have 24 stitches, and round 6 will increase to 30 stitches.
Keep following the crochet lemon instructions. Keep the stitch count until round 15. Then, start decreasing to shape the lemon’s end. By round 18, you’ll have 6 stitches again.

Remember to fill your lemon with polyester fiberfill as you crochet. For a final touch, add 9mm safety eyes or embroider facial features with black thread. Your lemon will be about 3.5 inches long. It’s perfect for summer decor or a unique gift!
Creating the Lemon’s Main Body
It’s time to make your crochet lemon body come to life! This guide will walk you through each step. We’ll focus on amigurumi shaping to get that perfect citrus shape.
Round-by-Round Instructions
Begin with a magic ring and 6 single crochets. Each round will shape your lemon:
- Round 1: 6 SC in magic ring
- Round 2: Increase to 12 SC
- Round 3: *1 SC, increase* repeat 6 times (18 SC)
- Round 4: *2 SC, increase* repeat 6 times (24 SC)
- Continue increasing until you reach your desired lemon size
Shaping Techniques
Amigurumi shaping is essential for a realistic lemon. Increase stitches in the first half to widen it. Then, use decreases to taper the end. This method gives your lemon its oval shape.

Stuffing Guidelines
Start stuffing when your lemon is 75% done. Add fiberfill bit by bit for even filling. Stuff firmly for a plump look, but don’t overstuff. Keep crocheting and stuffing until you finish the last rounds, then seal your lemon.
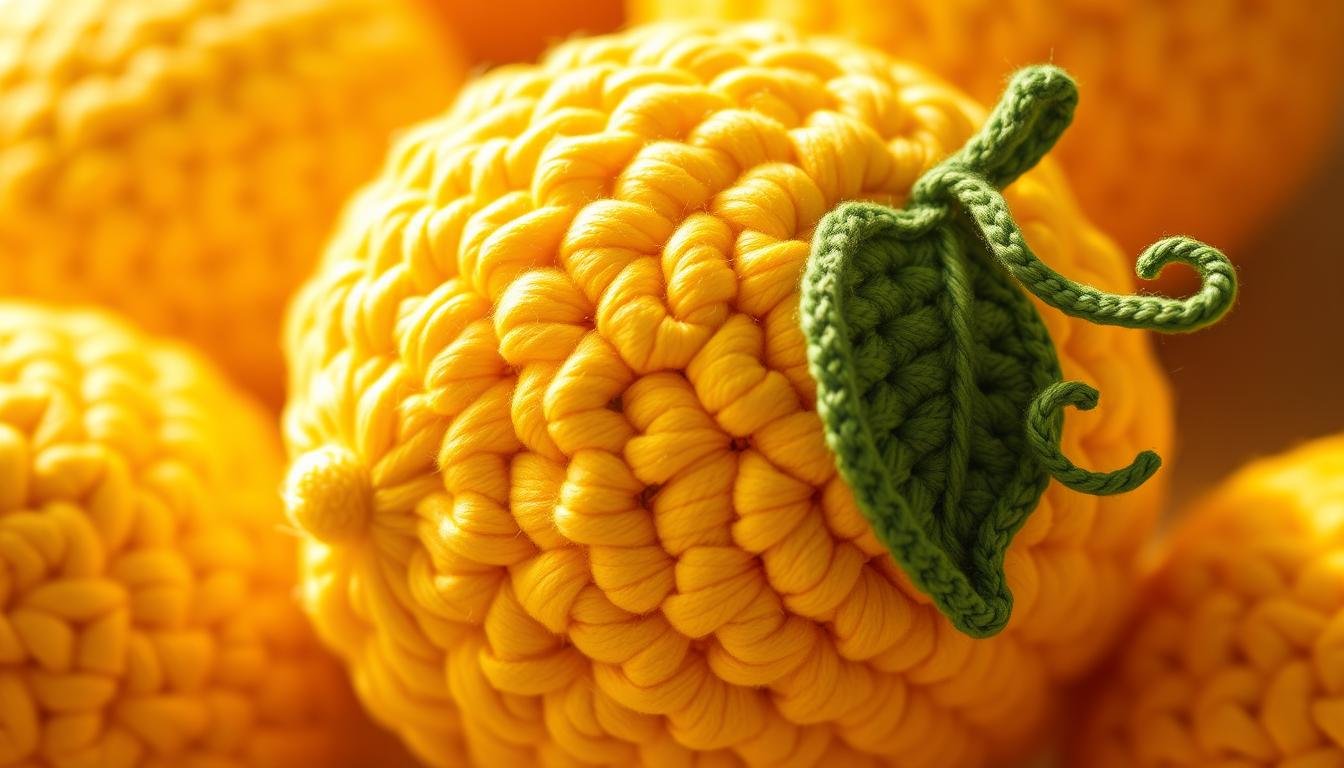
Adding the Decorative Leaf Detail
No lemon is complete without its signature leaf! Let’s bring your crochet lemon to life with a charming leaf detail. This step adds a pop of color and realism to your citrus creation.
Start your crochet leaf pattern with a foundation chain of 24 stitches. Form the leaf’s pointed tip by working 3 single crochet stitches into the same stitch during the first round. In the second round, add a picot stitch at the tip for extra detail.

Use light green yarn for the main leaf and dark green for the stem. This color combination creates a natural-looking lemon leaf detail. Work 2 rounds to shape your leaf, increasing and decreasing stitches as needed to form the leaf’s outline.
Once your leaf is complete, it’s time to attach it to your lemon. Position the leaf at the top of your crocheted lemon and secure it with a few well-placed stitches. This small addition transforms your project from a simple yellow sphere into a recognizable lemon.
Remember, practice makes perfect! If you’re new to crocheting leaves, don’t worry. This pattern is beginner-friendly and uses basic stitches like single crochet and slip stitch. With a little patience, you’ll master the lemon leaf detail in no time.
Color Work and Yarn Management Tips
Mastering crochet color work opens up a world of creative possibilities. Techniques like tapestry, intarsia, and fair isle crochet let you bring vibrant designs to life. Effective yarn management is key to achieving clean, professional-looking results.
Intarsia Technique Basics
Intarsia crochet creates color blocks in your work. It’s perfect for bold patterns like the cowhide coaster design. In this project, you’ll work with 20 stitches across 20 rows, alternating between white and brown yarn.

Carrying Yarn Effectively
Yarn management is vital for your color work. When using multiple colors, combine float and bobbin methods to reduce tangling. For denser fabrics, carry unused colors by stitching over them.
This works well for wall hangings and placemats. To maintain drape, use the float method, leaving slack in the strands.
Remember, changing colors one stitch before the new section begins creates smoother transitions. On the right side, crochet over unworked strands. On the wrong side, use the floating technique.
Keep color changes to five or fewer for balanced aesthetics. With these tips, you’ll be creating stunning color work projects in no time!
Finishing Touches and Assembly
You’re almost done with your crochet lemon! Let’s finish it off with some final steps. First, close the top of your lemon by weaving in any loose ends. This step is key for a clean look.
If you’re adding a face, now’s the time to attach safety eyes. Place them between rounds 10 and 11, about 10 stitches apart. For a smile, use pink yarn to embroider a simple line. These small touches can make your lemon very special!

| Component | Quantity | Rounds |
|---|---|---|
| Body panels | 2 | 21 |
| Eyes | 4 | 1 |
| Cheeks | 2 | 1 |
| Leaves | 2 | 2 |
Take your time with these final steps. The details are what make amigurumi special. Once done, your 5-inch tall crochet lemon will light up any room!
Pattern Variations and Creative Ideas
Crochet pattern variations open up endless possibilities for your lemon designs. Explore some creative lemon designs to elevate your crochet skills.
Size Modifications
Change your crochet lemon pattern to make fruits of different sizes. Create tiny garnish-sized lemons or large decorative pieces. Adjust your hook size and yarn weight for various dimensions.

Design Alternatives
Be creative with your lemon designs. Try crocheting lemon slices or add textured bumps for a realistic look. Use the Lemon Peel Stitch for a unique texture. This stitch alternates single and double crochet, creating a sturdy fabric for many projects.
| Design Idea | Stitch Pattern | Suggested Use |
|---|---|---|
| Lemon Slice | Circular pattern | Coasters, wall art |
| Textured Lemon | Bobble stitch | Plush toys, 3D decor |
| Lemon Peel Stitch | SC and DC alternating | Washcloths, bags |
| Citrus Collection | Color work | Kitchen decor set |
Expand your citrus collection by adapting the pattern for other fruits. With color changes and minor adjustments, create limes, oranges, or grapefruits. Let your imagination run wild and build a vibrant crochet citrus family!
Blocking and Shaping Your Lemon
Crochet blocking is key to perfecting your lemon’s shape. It makes your stitches even and improves your lemon’s look. Start by gently wetting your lemon with lukewarm water. Then, pin it to a blocking board and shape it as you want.
To get a smooth lemon, focus on its rounded shape. Use pins to hold parts like the top and bottom in place. Let it dry completely before taking out the pins. This step keeps your lemon looking good.

When making many lemons, keep their shapes the same. This is vital for sets or big projects. Good blocking can make your lemon look amazing, like a pro’s work.
| Blocking Step | Duration | Purpose |
|---|---|---|
| Soaking | 10 minutes | Relaxes fibers |
| Pinning | 5-10 minutes | Sets shape |
| Drying | 24-48 hours | Locks in shape |
Decorative Uses and Display Ideas
Your crochet lemon decor is ready to brighten up any space! Let’s explore creative ways to showcase your citrus creation. Turn it into charming amigurumi gifts.
Home Decor Applications
Crochet lemon decor adds a zesty touch to your home. Create a fruit-themed kitchen display or use your lemon as a unique pincushion. For a refreshing look, arrange a bowl of crocheted lemons as a centerpiece.
Craft enthusiasts have come up with 30 unique designs for lemon-themed items. This includes 5 distinct lemon appliques.
- Lemon pillow
- Lemon wall hanging
- Lemon throw blanket
- Lemon table runner
- Lemon pot holder
- Lemon wreath
Gift-Giving Suggestions
Crochet lemons make delightful amigurumi gifts. Package them in a cute basket for housewarming parties or summer barbecues. Small crochet lemon projects like keychains, coasters, magnets, pouches, and earrings are perfect for personal gifts.
For seasonal charm, consider these lemon-themed items:
- Lemon jar cover
- Lemon soap cozy
- Lemon candle holder
- Lemon garland
The Lemon Farmhouse series offers multiple crochet patterns that can be combined for gift sets. With a 100% satisfaction rate from users, these crochet lemon projects are sure to delight both makers and recipients alike.
Care Instructions and Maintenance
Your crochet lemon needs the right care to stay bright and lively. With the right steps, your lemon will be a delightful decoration for a long time.
To keep it clean, just dust it with a soft, dry cloth. For small stains, use a damp cloth with a bit of soap. But don’t soak it or wash it in a machine. This can mess up its shape and harm the material.
Keep your lemon in a cool, dry spot, away from sunlight to stop it from fading. You might want to put it in a cloth bag or box to keep dust off. Also, squeeze it gently now and then to keep its shape.
| Care Task | Frequency | Method |
|---|---|---|
| Dusting | Weekly | Soft, dry cloth |
| Spot Cleaning | As needed | Damp cloth with mild soap |
| Reshaping | Monthly | Gentle squeezing |
| Storage Check | Quarterly | Inspect for pests or damage |
By following these easy care tips, your crochet lemon will stay as fresh as the day you made it. It will add a lively touch to your home for many years.
Troubleshooting Common Issues
Crochet troubleshooting and solving amigurumi problems are key for crafters. Let’s look at common challenges when making lemon decorations and how to fix them.
Tension Problems
Keeping your stitches even is vital for a neat finish. If your stitches are too tight, use a bigger hook. For loose stitches, try a smaller one. Remember, 62% of crocheters have ongoing projects, so don’t worry if you need to tweak your method.
Shaping Solutions
Getting the lemon shape right can be hard. Always count your stitches at the end of each round to stay on track. Use stitch markers for increases and decreases. If your lemon looks off, it’s okay to frog and start over. This skill is useful for both beginners and pros.
Color Work Challenges
Working with many colors can lead to yarn tangles. Work slowly to avoid knots and use separate yarn balls for each color. If you’re new to color work, practice on a small swatch first. Smooth yarns like Red Heart Super Saver are easier to handle and frog if needed.
Don’t let these problems stop you. With practice and patience, you’ll get better at crochet and make stunning amigurumi lemons. If you’re stuck, take a break. It can help you solve problems better and reduce frustration.
Pattern Gauge and Measurements
Getting the right crochet gauge is key to creating a perfectly sized lemon. For this pattern, aim for 8 stitches and 10 rows to measure 4 inches square. This gauge ensures your finished lemon will be about 26 inches long with a 40-inch circumference at its widest point.
To check your gauge, crochet a small swatch using the recommended 2.5 mm hook. Count your stitches and rows over a 4-inch area. If your swatch is too small, try a larger hook. If it’s too big, switch to a smaller one. Remember, achieving the correct gauge is more important than using the exact hook size specified.
For accurate amigurumi measurements, count your stitches in each round. The lemon pattern starts with 6 stitches in Round 1 and increases to 78 stitches by Round 21. It then decreases back to 6 stitches in the final round. The leaf requires a 24-stitch foundation chain and two rounds of varying stitches.
Don’t worry if your first attempt isn’t perfect. With practice, you’ll master the art of maintaining consistent tension, resulting in a beautifully shaped lemon decoration.
Additional Citrus Pattern Combinations
Expand your crochet citrus patterns collection with delightful variations on the lemon theme. Creating an amigurumi fruit collection is a fun way to brighten up your home or craft unique gifts. Let’s explore how to adapt the lemon pattern to create other zesty citrus fruits.
Matching Lime Pattern
Transform your lemon into a lime with a simple color swap. Use bright green yarn for the main body and light green for accents. The lime follows the same basic structure as the lemon, but with a slightly more oval shape. Adjust the increases in rounds 3-5 to achieve this elongated look.
Orange Variations
For a juicy orange, select vibrant orange yarn. To create a realistic peel texture, try using a textured stitch like the bobble stitch every few rows. You can also experiment with color changes to mimic the subtle shading of a real orange.
| Fruit | Main Color | Accent Color | Special Feature |
|---|---|---|---|
| Lemon | Yellow | White | Standard pattern |
| Lime | Bright Green | Light Green | Oval shape |
| Orange | Orange | Dark Orange | Textured peel |
By mastering these variations, you’ll soon have a complete amigurumi fruit collection. Mix and match your crochet citrus patterns to create charming decorations or a playful fruit bowl display. Let your creativity flow and watch your citrus garden grow stitch by stitch!
Copyright and Pattern Usage Guidelines
When you make a crochet lemon, knowing about copyright and usage rights is key. Copyright kicks in as soon as a pattern is written down. It protects the unique way ideas are expressed, but not the techniques themselves. Designers can register their work for extra protection, but it costs at least $65.
You can make and sell items from this pattern for personal use or small sales. But remember, the pattern itself is protected. You can’t share or resell the instructions without permission. Always give credit to the pattern creator if you show your work online. This supports the crochet community and respects their work.
It’s common to see similar designs in the fiber arts world. This usually comes from shared inspiration, not copying. If you’re worried about infringement, keep records and consider legal advice. The crochet community values creativity and respects designers’ work. So, let’s keep it that way as you enjoy your citrusy creation!