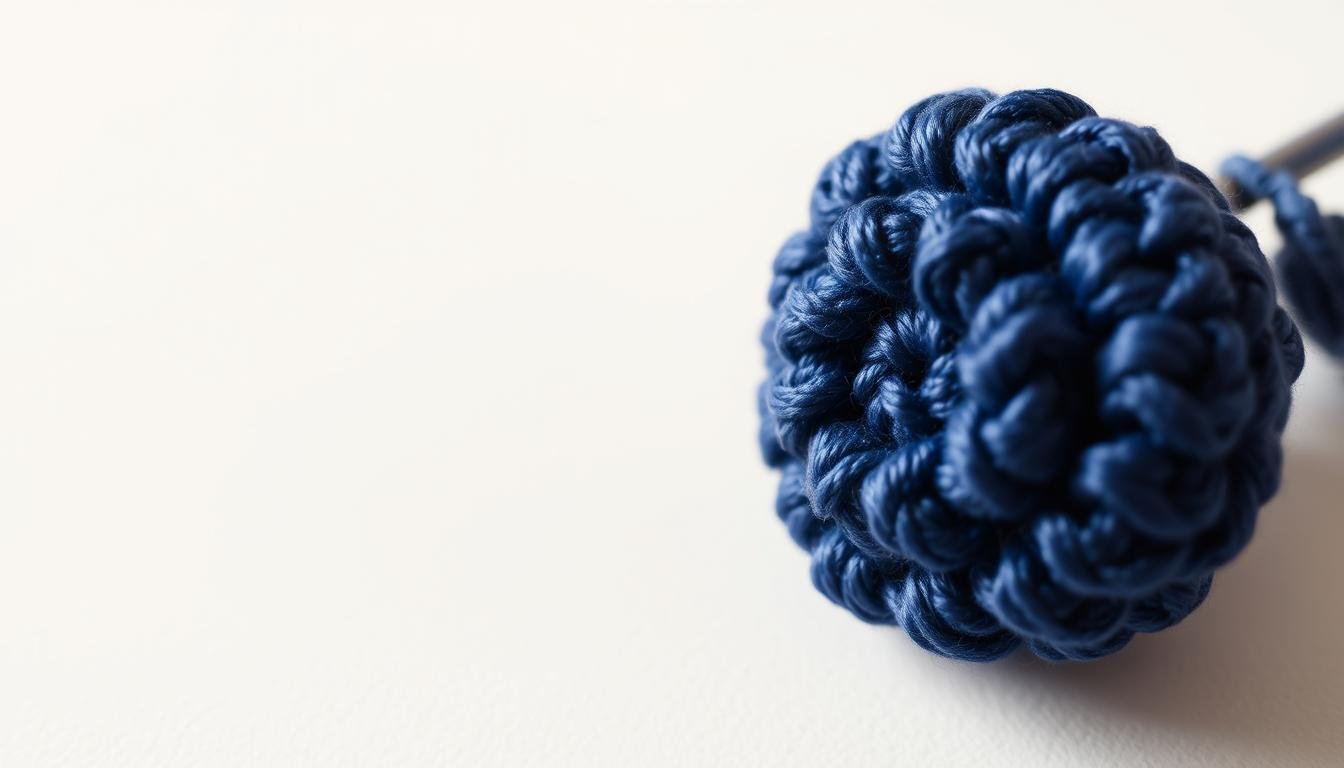
Welcome to the ultimate guide for making an adorable crochet blueberry! This free pattern is great for both beginners and experienced crafters. You can create charming fruit designs in just a few hours. You’ll turn simple yarn into a delightful miniature blueberry that brings joy.
This crochet fruit pattern is perfect for quick and fun projects. It’s a great way to start with amigurumi. Whether you want to make one blueberry or a basket full, our tutorial will help you every step of the way.
This small project needs only a few materials and can be done in 1-2 hours. It’s easy for beginners, making it perfect for those new to crochet or looking to improve. Get ready to make something cute, small, and looks delicious!
Grab your crochet hook and let’s make a sweet little blueberry. No need for advanced skills – just be eager to learn!
Essential Materials and Tools for Your Blueberry Project
Getting the right crochet supplies is key for a perfect blueberry. Before starting, make sure you have everything you need. This will make your project smooth and enjoyable.
Recommended Yarn Types and Colors
The colors of your yarn are very important. They help make your blueberry look real. Here are some colors to consider:
- Light purple for a soft blueberry look
- Dark blue for a deep blueberry color
- Beige for highlights
Use cotton sports weight yarn for the best results. It’s light, which is great for detailed work. Plus, it feels soft and real.
Required Hook Sizes
Choosing the right crochet hook is very important. For this blueberry, we suggest:
- 2mm for tight, neat stitches
- Hook sizes from 1.6mm to 2.5mm are good too
Additional Supplies Needed
You’ll need more than just yarn and a hook for your blueberry. Here’s what else you’ll need:
- Sharp fabric scissors
- Sewing needle
- Fiber fill for stuffing
- Stitch markers
- Optional: Safety eyes or black embroidery thread
Remember, keeping your stitches even is important. It makes your blueberry look professional. Take your time and practice.
Understanding Basic Crochet Terms and Abbreviations
Starting with crochet can seem daunting with all the special terms. Knowing the basics of crochet terminology and amigurumi abbreviations is key for a successful blueberry project. Let’s explore the essential terms you’ll find in this pattern.
Crochet has its own language, which might confuse you at first. But, learning these key abbreviations makes following patterns much simpler. We’ll focus on US crochet terms, which differ from international ones.
Common Crochet Abbreviations
- sc: Single Crochet – the most basic stitch
- hdc: Half Double Crochet – slightly taller than single crochet
- inc: Increase – adding stitches to expand your work
- dec: Decrease – reducing stitches to shape your project
- FL: Front Loop – working in the front part of the stitch
Stitch Variations to Know
| Stitch Type | Difficulty Level | Best Used For |
|---|---|---|
| Single Crochet | Beginner | Tight, sturdy fabric |
| Half Double Crochet | Beginner | Moderate height, versatile |
| Increase/Decrease | Intermediate | Shaping amigurumi projects |
When working on your blueberry pattern, focus on these abbreviations. Practice each stitch before starting the main project to build confidence. Remember, every expert crocheter started exactly where you are now!
Special Stitches for the Blueberry Pattern
Explore the world of crochet stitch techniques that will make your blueberry project stand out. Learning special stitches is essential for adding texture and depth to your crochet.

Making the perfect crochet blueberry needs specific skills and unique stitch methods. These techniques will help you create a realistic and textured fruit that will catch everyone’s eye in your crafting project.
Mastering the 3hdc-puff Stitch
The 3hdc-puff stitch is a key technique in your puff stitch tutorial. It creates a beautiful rounded texture that looks like a blueberry’s soft surface. Here’s how to do it:
- Yarn over and insert hook into the same stitch
- Pull through and complete partial double crochet
- Repeat this process three times in the same stitch
- Pull through all six loops on your hook
Chain Space Techniques
Chain spaces are key for creating gaps between your puff stitches. These gaps help give your blueberry a natural, organic look. Try different chain lengths to get varied textures.
Double Crochet Variations
Double crochet techniques add depth and structure to your blueberry pattern. By mixing standard double crochet with puff stitches, you’ll get a fabric that looks like a real blueberry.
Pro tip: Practice these crochet stitch techniques on a small swatch before starting your full project. The recommended foundation chain is (Multiple of 6) + 3 + 1, usually 22 chains for a sample swatch.
Foundation Chain and Starting Instructions

Starting your amigurumi project begins with mastering the crochet foundation chain. This step is key to your entire blueberry creation. It’s important to learn how to make a consistent and even foundation chain for a professional look.
When making your crochet foundation chain for this blueberry pattern, follow a specific method. The goal is to keep your tension even throughout. Uneven chains can make your fruit look lumpy or misshapen, so take your time and practice.
- Start with the recommended multiple of 6 stitches
- Add 3 additional stitches
- Include 1 beginning chain
For a sample blueberry project, start with about 22 chains. Practicing your foundation chain technique is key for a smooth base for your amigurumi project.
Pro tip for starting amigurumi: Keep your tension relaxed but consistent. Tight chains can make it hard to work on subsequent rounds. On the other hand, chains that are too loose may not hold up well. Find your ideal tension by practicing several foundation chains before starting your project.
- Practice creating even chain stitches
- Check your tension regularly
- Use a consistent hook size
Remember, the foundation chain is the backbone of your crochet project. With patience and practice, you’ll master the skills needed for beautiful, professional-looking amigurumi fruits and other crocheted items.
Free Crochet Blueberry Pattern Instructions
Ready to make your own adorable amigurumi blueberry? This guide will help you through each step to make a perfect 5-inch blueberry. It’s easy for beginners and takes about 1 hour. You only need one 50g skein of yarn.

Before starting, let’s go over some basic crochet skills. You need to keep track of your stitches. This is key to getting the right shape and size for your blueberry.
Pattern Materials and Preparation
- 1 skein of Patons Astra in Hot Blue (yarn size 3)
- Crochet hook for the yarn weight
- 6/7mm safety eyes
- Stuffing material
- Stitch marker
Row-by-Row Instructions
Follow these detailed crochet pattern instructions carefully:
- Row 1 (WS): Create a magic ring, 1 single crochet (sc) in 2nd chain from hook
- Row 2: Chain 3 (counts as 1 double crochet)
- Continue working 3hdc-puff stitches in designated spaces
- Maintain consistent tension throughout
Stitch Count Verification
To ensure accuracy in your amigurumi row counting, use these tips:
- Count stitches at the end of each row
- Use a stitch marker to track row progress
- Check your work against the pattern gauge of 24 stitches per 4 inches
Pattern Repeat Guidelines
The complete blueberry pattern involves 27 total steps. Pro tip: Practice consistent tension to achieve the perfect 5-inch blueberry shape. Feel free to adjust your technique as you become more comfortable with the pattern.
This beginner-friendly tutorial includes optional embellishments like cute facial features using black and magenta embroidery threads. With interactive features and clear instructions, you’ll create a charming amigurumi blueberry in no time!
Creating the Blueberry Shape and Structure

Mastering crochet shaping techniques is key for an authentic amigurumi fruit. Your blueberry project needs careful attention to stitch increases and structure. This is to get a realistic rounded form.
To start your blueberry, you’ll use special shaping strategies. These turn flat stitches into a three-dimensional fruit. The magic ring is used at the beginning for a tight, compact start.
- Start with a magic ring for a seamless bottom
- Use gradual increases to create rounded curves
- Maintain consistent tension for smooth shaping
The success of crochet shaping techniques comes from understanding each round’s role. You’ll do a series of strategic increases. These increases expand your stitches, making a dome-like shape that looks like a real blueberry.
As you go, pay attention to even stitch distribution and counting. Each round adds to the previous one. This turns your initial stitches into a fruit shape that looks like a plump, juicy blueberry.
Adding Texture and Dimension to Your Blueberry
Making a realistic amigurumi fruit needs special crochet skills. These skills make your blueberry look real. It’s all about adding depth and surface details.

With the right stitches, your blueberry will go from simple to lifelike. It’s all about using yarn and hook to create bumps and curves. These mimic nature’s design.
Mastering the Puff Stitch Pattern
Puff stitches are key for a realistic blueberry texture. Here’s how to do it:
- Work 3 half-double crochet stitches in the same stitch
- Create small, raised bumps that simulate a blueberry’s natural surface
- Space your puff stitches evenly for a consistent look
Creating Natural-Looking Curves
Natural curves are essential for realistic fruit designs. Try these methods:
- Work in the back loop only to add depth
- Adjust your tension to create gentle, organic shapes
- Use strategic increases and decreases to form smooth contours
Professional crocheters focus on small details for texture. Your blueberry will look real with puff stitches and careful shaping. These techniques capture the essence of a real fruit.
Color Changes and Blending Techniques

To make a realistic amigurumi blueberry, you need to be good at changing colors. The right way to blend colors can make your project look amazing. Learning how to smoothly switch between yarn colors is key to a professional finish.
When making your blueberry, keep these tips in mind for blending colors well:
- Select yarns with complementary color gradients
- Practice precise color transition techniques
- Manage yarn ends for clean color changes
- Maintain consistent tension during color shifts
Start by picking yarns that go well together. Worsted-weight acrylic yarns are great for color pooling. Brands like I Love This Cotton and Caron Simply Soft have colors that add depth to your blueberry.
Experts say to use the “join and cut” method for smooth color changes. This means you finish the last stitch of the current color, then add the new yarn by pulling it through the last loop. Make sure to weave in loose ends well to keep it looking neat.
Remember, the more you practice, the better you’ll get at changing colors. Try different yarns and colors to find your own style in amigurumi.
Assembling Your Crocheted Blueberry

To bring your crocheted blueberry to life, you need to focus on amigurumi assembly and crochet fruit finishing. The details of how you connect and shape your project are key to a professional look.
First, gather all your crocheted parts. For a realistic blueberry, make sure each piece is ready for joining. The assembly process includes several important steps:
- Prepare your stuffing material
- Align the crocheted panels carefully
- Use a tapestry needle for invisible seams
- Check tension while joining
When stuffing your blueberry, use small amounts of fiberfill for the perfect plump shape. Gently pack the stuffing to avoid lumps or uneven areas. Fill the piece slowly and evenly to keep its round shape.
For finishing your crochet fruit, focus on closing the final opening. Use a mattress stitch or invisible join to make a seamless closure. This ensures your blueberry looks professional and polished.
Pro tip: If you’re making multiple blueberries, keep your stuffing and assembly techniques consistent. This will help your blueberries look uniform.
Tips for Achieving the Perfect Blueberry Shape
Making a realistic crocheted blueberry needs skill and precision. You must master two key areas: keeping tension even and stuffing well.

Getting your crochet tension right is key for a uniform, professional blueberry. If your tension is off, your blueberry might look misshapen or bumpy.
Maintaining Consistent Tension
To get the right tension in your crochet, try these tips:
- Practice keeping your yarn grip even
- Use stitch markers to keep track
- Check your tension as you go
- Choose a hook size that feels right
Mastering Amigurumi Stuffing Techniques
Stuffing well is key for a realistic blueberry. Small amounts of stuffing work best to avoid lumps and keep it smooth.
- Use high-quality polyester fiberfill
- Stuff in small amounts as you go
- Spread stuffing out evenly
- Avoid stuffing too much to keep the shape right
By focusing on these tips for tension and stuffing, you’ll make a blueberry that looks great and is fun to make.
Decorative Elements and Finishing Touches

Turn your crochet blueberry into a cute masterpiece with the right embellishments. The right touches can make your creation stand out. They add personality and charm to your fruit friend.
When adding details to your crochet fruit, consider these important elements:
- Embroidered facial features
- Delicate stem attachments
- Subtle texture enhancements
- Color gradient techniques
For a realistic blueberry look, focus on the eyes. Embroider eyes around round 8, placing them carefully for a cute look. Add a small smile one round below the eyes, using just three stitches for a delicate touch.
Practice your embroidery on scrap yarn to get better. Try different thread colors and stitches to make your blueberry unique. Remember, tiny details make a big difference in bringing your creation to life.
Be creative with your finishing touches. A well-placed leaf, a bit of shimmer, or tiny accessories can make your blueberry special. It can go from a simple project to a charming collectible.
Sizing Variations for Different Projects
Crafting the perfect crochet blueberry opens up a world of creative possibilities. Your amigurumi fruit applications can transform from tiny decorative charms to substantial home decor pieces with just a few simple adjustments to crochet project sizing.
The versatility of this blueberry pattern allows you to customize your project for various needs. Let’s explore how you can adapt the sizing for different applications:
Baby-Friendly Crochet Blueberries
When creating items for little ones, size and safety are key. Here are important tips for baby-friendly blueberry projects:
- Use soft, hypoallergenic yarn
- Ensure no loose parts that could become choking hazards
- Make blueberries between 2-4 inches for optimal handling
- Stuff firmly but not too tightly
Home Decor Sizing Options
Transform your crochet blueberry into stunning decorative elements with these sizing strategies:
- Small Accents: 1-2 inches perfect for garlands
- Medium Decorations: 4-6 inches ideal for wreaths
- Large Statement Pieces: 8-12 inches for dramatic home displays
Pro tip: Adjust your hook size and yarn weight to achieve different dimensions while maintaining the pattern’s integrity. With practice, you’ll master scaling your crochet blueberry for any project imaginable!
Troubleshooting Common Issues
Crocheting a blueberry amigurumi can sometimes be tricky. But, fixing common problems is easy with the right techniques. You can quickly solve most issues that come up during your project.
When you’re working on your blueberry pattern, you might run into some usual problems. Here are some solutions for common crochet issues:
- Uneven Stitches: Check your tension and make sure you’re using consistent yarn pressure
- Gaps Between Stitches: Try using a smaller hook or tighten your yarn tension
- Shape Distortion: Adjust how you stuff to keep the shape right
- Color Bleeding: Wash your finished piece with color-catching sheets
Mastering puff stitch techniques can be hard for beginners. If you’re having trouble, practice the stitch alone before adding it to your blueberry pattern. Watch tutorial videos and focus on your hook movements.
Remember, getting better takes time and practice. Don’t worry if your first tries aren’t perfect. Every mistake is a chance to get better at fixing amigurumi problems and become more confident in your crocheting skills.
Creative Project Ideas Using the Pattern
Now that you’ve mastered the crochet blueberry pattern, the world of amigurumi fruit crafts is yours to explore. Imagine turning these cute blueberries into charming accessories and decorations. Your skills will shine in everything from baby items to home decor.
Think about making a baby wrap with crochet blueberries. Or a baby dress with blueberry designs that will grab everyone’s eye. For those who love cooking, try making fruit-themed pot holders or coasters to add fun to your kitchen.
Seasonal decorations are a great use for your amigurumi fruit crafts. Create a summer wreath full of colorful blueberries or a festive garland to brighten any room. Kids will adore play food sets with your handmade blueberries. Crafters might enjoy using them as unique keychains or bag decorations.
The best part about crochet blueberry projects is how versatile they are. Whether you want to make special gifts, decorate your home, or just enjoy the craft, your blueberry pattern has endless possibilities. It’s a great way to express your creativity and show off your skills.