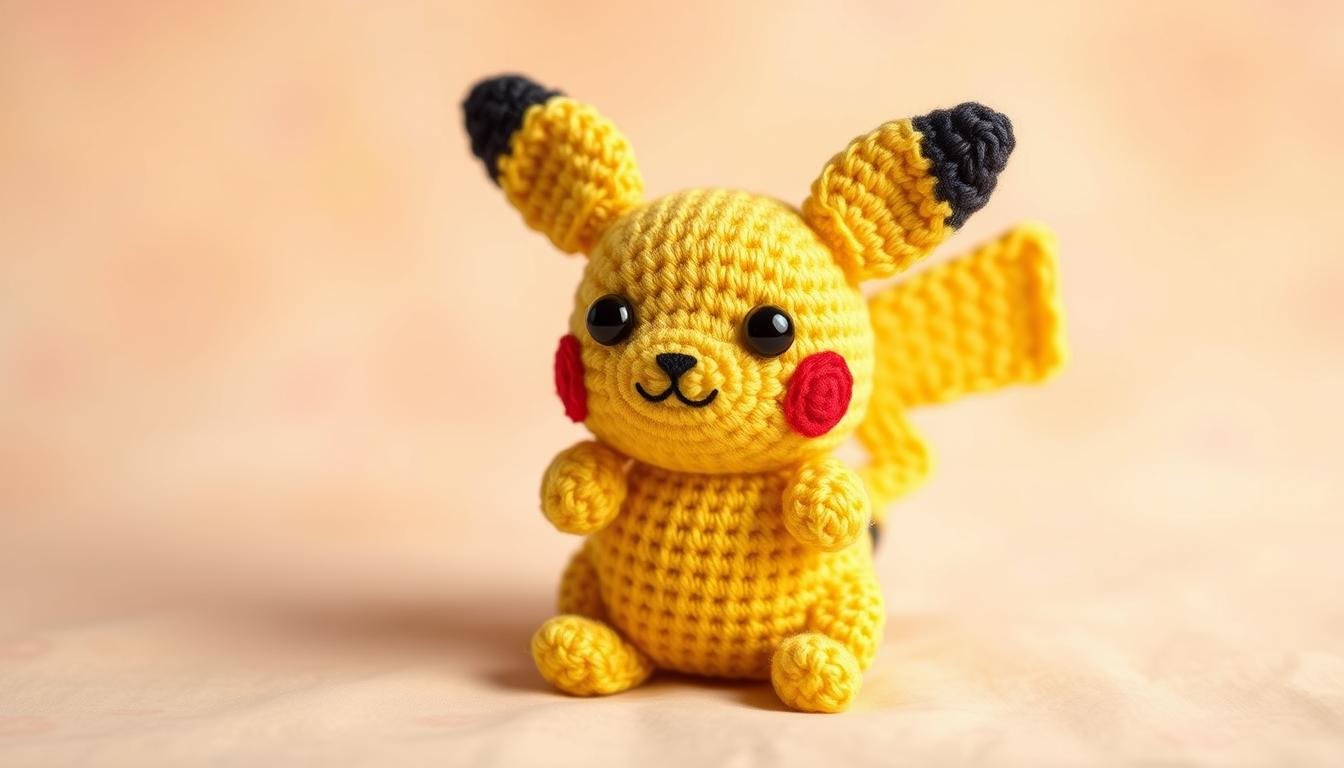
Are you ready for a fun crochet adventure? Make your own adorable Pikachu with our simple pattern! This beloved Pokemon character becomes a cuddly 27 cm (10.5 inches) tall amigurumi. It’s perfect for fans and crafters.
Our guide makes it easy to follow, breaking it down into 16 pieces. You’ll need a 3.25 mm hook and Red Heart Super Saver yarn in Bright Yellow, Black, Cafe Latte, and Cherry Red. Also, grab a pair of 12 mm safety eyes for Pikachu’s signature look!
The pattern includes detailed steps for Pikachu’s legs and arms. You’ll learn to make its iconic tail and cute red cheeks. It’s all about simple techniques like magic rings and strategic increases. Get ready to create the world’s favorite Electric-type Pokemon!
Essential Materials and Supplies for Your Pikachu Project
Ready to bring Pikachu to life? Let’s gather the crochet supplies you’ll need. This adorable project requires specific yarn for Pikachu and a few key tools to get started.
Recommended Yarn Types and Colors
For the perfect Pikachu, you’ll want Aran weight yarn. Paintbox Simply Aran is a great choice. Here’s what you need:
- Buttercup Yellow (main body)
- Pure Black (eyes and stripes)
- Paper White (eye details)
- Coffee Bean (ear tips)
- Soft Fudge (tail base)
- Rose Red (cheeks)
Required Crochet Hook Sizes
A 3mm hook is ideal for this project. It’ll help you achieve the right tension for a 6-inch tall Pikachu. Remember, your yarn choice might affect the final size.
Additional Tools and Notions
Don’t forget these extras:
- 12mm safety eyes
- Stuffing
- Yarn needle
- Stitch markers
- Scissors
With these crochet supplies in hand, you’re all set to start your Pikachu project. The pattern uses US crochet terms, so make sure you’re familiar with those. Happy crocheting!
Getting Started with Your Pikachu Crochet Pattern
Ready to start crochet Pikachu? Let’s dive into this exciting Pokemon crochet adventure! The first step is mastering the magic ring. This is a key technique for most amigurumi projects. It will form the foundation of your Pikachu’s head or body.
To begin Pokemon crochet, you’ll need a 3.0mm hook and Paintbox DK Cotton yarn in Buttercup Yellow for the body. The pattern starts with 6 stitches in the magic ring. It increases to 12 in round 2, and 18 in round 3. This gradual increase creates the spherical shape of Pikachu’s body or head.
As you work through the initial rounds, focus on maintaining even tension. This is key to achieving a polished look for your Pikachu. Remember, the body section consists of 17 rounds, reaching a maximum of 48 stitches in round 7.
Don’t worry if it seems challenging at first. With practice, you’ll soon find your rhythm. You’ll be well on your way to creating an adorable Pikachu that stands about 7 inches tall when sitting. Happy crocheting!
Understanding Crochet Terminology and Techniques
Starting with crochet terms and amigurumi techniques can seem like learning a new language. But don’t worry! We’ll cover the basics to help you ace your Pikachu project.
Basic Stitch Abbreviations
Crochet patterns use short forms to save space. Here’s a quick guide to common abbreviations:
- sc: single crochet
- inc: increase
- dec: decrease
- hdc: half double crochet
- BLO: back loop only
- Ch: chain
Special Stitches for Pikachu
Our Pikachu pattern uses six different crochet stitches. You’ll craft 48 rounds for the head alone! This variety adds depth to your amigurumi, creating Pikachu’s iconic features.

Reading Pattern Instructions
Patterns often include round-by-round instructions with stitch counts. For example, “Round 1: 6 sc in magic ring (6)” means make 6 single crochet stitches in a magic ring, ending with 6 total stitches. As you progress, you’ll assemble 6 different parts to complete your Pikachu.
With these crochet terms and amigurumi techniques under your belt, you’re ready to bring Pikachu to life! Remember, practice makes perfect, and soon you’ll be reading patterns like a pro.
Creating Pikachu’s Head and Face Features
Making the crochet Pikachu head is a fun and rewarding process. You’ll bring this beloved character to life with just a few key steps. Let’s dive into the details of constructing Pikachu’s adorable face!
Head Construction Steps
Start by crocheting in rounds to form Pikachu’s spherical head. Use yellow worsted weight yarn and follow this stitch count guide:
| Row | Stitch Count |
|---|---|
| 1 | 6 |
| 2 | 12 |
| 3 | 18 |
| 4 | 24 |
| 5 | 30 |
| 6 | 36 |
| 7 | 42 |
Placing Safety Eyes
For Pikachu’s expressive gaze, use 10mm safety eyes. Place them between rows 7 and 8, with 9 stitches between each eye. This placement ensures your Pikachu has that iconic wide-eyed look.

Adding Facial Details
Complete your amigurumi face features by embroidering Pikachu’s nose and mouth. Use black yarn for the nose, placing it 2-3 rows below the eyes. Create a simple ‘v’ shape for the mouth, giving Pikachu its cheerful smile. Remember, small details make a big difference in bringing your crochet Pikachu to life!
Crafting Pikachu’s Body Structure
Now that you’ve finished Pikachu’s adorable face, it’s time to bring your crochet Pokemon body to life! The amigurumi structure for Pikachu’s body is simple yet key for that iconic round shape.
Start by crocheting a magic ring with 6 single crochet stitches. Increase evenly in each round until you reach 60 stitches at round 10. This forms the widest part of Pikachu’s body. Continue with straight rounds to create the cylindrical shape, then decrease gradually to form the bottom.

Use Yellow yarn for the main body and don’t forget to leave an opening for stuffing. The body typically takes about 27 rounds to complete. For a stable base, crochet the last few rounds tightly. This will help your Pikachu stand upright and ready for hugs!
Remember, tension is key in maintaining the amigurumi structure. Keep your stitches consistent to ensure a smooth, professional finish. Once you’ve completed the body, you’re ready to attach the head and move on to crafting Pikachu’s cute limbs!
Mastering the Iconic Pikachu Tail
Creating the perfect crochet Pikachu tail is key to bringing your Pokemon amigurumi to life. This lightning bolt-shaped feature makes Pikachu stand out. Let’s look at two ways to make this iconic tail.
Traditional Tail Method
The classic way is crocheting a 3D zigzag shape. This method makes the tail pop and shows Pikachu’s energy. To get this look, crochet in short rows, adding and subtracting stitches for the lightning bolt shape.
Alternative Flat Tail Technique
Try the flat tail technique for a different look. This method crochets a flat piece in a lightning bolt shape. After finishing, stuff it lightly and shape it for dimension. This method is great for beginners or those who want a less bold tail.

Attaching and Shaping Tips
Proper attachment is vital for a great Pokemon amigurumi tail. Use a yarn needle to sew the tail to Pikachu’s body. Stuff the tail lightly and shape it with your hands for the best look.
Remember, practice makes perfect with the crochet Pikachu tail. Feel free to try both methods to find your favorite. With these tips, your Pikachu will have an electrifyingly cute tail!
Shaping and Attaching Pikachu’s Ears
Ready to give your Pikachu its iconic look? Let’s craft those adorable pointy ears! Crochet pokemon ears are a key feature that bring your amigurumi to life. Using your 3.25 mm hook and yellow yarn, you’ll create two identical ear pieces.
Start with a magic ring and work in rounds. Each ear takes about 8 rounds, ending with 15 stitches. Shape the ears by increasing in the first few rounds, then working even for a few rounds, and then decreasing to form the pointed tip.

For the perfect amigurumi ear attachment, position the ears on either side of Pikachu’s head, about 9 stitches apart. This spacing matches the distance between the eyes. Sew the ears securely using a tapestry needle and matching yellow yarn.
| Ear Part | Stitch Count | Rounds |
|---|---|---|
| Base | 6 | 1 |
| Middle | 12 | 4-6 |
| Tip | 15 | 8 |
Remember, the ears give Pikachu its distinctive silhouette. Take your time shaping them to achieve that perfect curve and pointed tip. Your patience will pay off with an adorable, recognizable Pikachu!
Making and Positioning the Arms and Legs
Creating the crochet Pikachu limbs is a key step in making your amigurumi come to life. The arms and legs are small cylinders that make your Pikachu huggable. Let’s explore how to make these cute appendages.
Limb Construction Guide
To make Pikachu’s arms, start with 10 stitches and crochet for 9 rows. For the legs, start with 20 stitches and crochet 5 rows. Use the same bright yellow yarn as the body for a consistent look. Remember to stuff each limb lightly before closing it off.

Proper Placement Techniques
It’s important to place the amigurumi arms and legs correctly to get Pikachu’s iconic look. Attach the arms about 1 inch (2.54 cm) below the neck, slightly angled outward. Place the legs at the bottom of the body, making sure they’re evenly spaced for balance.
For a 7-inch tall Pikachu, position the arms about 4 inches (10.16 cm) apart and the legs about 2 inches (5.08 cm) apart. This spacing makes your Pikachu look chubby and cuddly, just like the character.
- Arms: 2 pieces, 10 stitches each, 9 rows long
- Legs: 2 pieces, 20 stitches each, 5 rows long
- Arm placement: 4 inches apart, 1 inch below neck
- Leg placement: 2 inches apart, at body bottom
With your crochet Pikachu limbs securely attached, your amigurumi is almost done. The right placement of arms and legs will let your Pikachu pose in adorable ways!
Adding Pikachu’s Signature Red Cheeks
No Pikachu is complete without those adorable rosy cheeks! Let’s explore how to create and attach Pikachu’s iconic red cheeks. This detail gives Pikachu its distinctive charm.

You have two main options for creating Pikachu’s red cheeks. The first method uses felt circles for a smooth look. Cut two small circles from red felt and attach them to Pikachu’s face using fabric glue or a few small stitches. This technique is quick and easy, perfect for beginners.
For a more textured appearance, you can crochet tiny circles separately. Use the love-heart red yarn specified in the pattern to make two small, flat circles. Attach these crocheted cheeks to Pikachu’s face using a needle and thread, ensuring they’re securely fastened.
| Method | Material | Difficulty | Texture |
|---|---|---|---|
| Felt Circles | Red Felt | Easy | Smooth |
| Crocheted Circles | Red Yarn | Intermediate | Textured |
When positioning the cheeks, place them slightly below and to the side of Pikachu’s eyes. This placement ensures your Pikachu has that authentic, cheerful expression. Remember, the Pikachu red cheeks are a small but vital detail that brings your amigurumi to life!
Step-by-Step Pikachu Crochet Pattern
Ready to bring Pikachu to life? This detailed pikachu pattern guides you through every stitch. You’ll create a perfect Pokemon pal. Follow these crochet pokemon instructions from start to finish.
Round-by-Round Instructions
Start Pikachu’s head with a magic ring. Here’s a breakdown of the first few rounds:
- Round 1: Crochet 6 stitches in the magic ring
- Round 2: Increase to 12 stitches
- Round 3: Work up to 18 stitches
- Round 4: Expand to 24 stitches
- Round 5: Reach 30 stitches
Keep increasing until you hit 42 stitches at Round 8. Hold this count for the next five rounds before shaping the head.

Stitch Count Tracking
Track your progress with these stitch counts:
- Head: 42 stitches at its widest
- Body: Peaks at 44 stitches
- Arms and feet: Start with 6 stitches each
- Ears: Begin with 6, end with 15 stitches
Progress Checkpoints
Hit these milestones to stay on track:
- Head completion: Round 18
- Body shaping: Round 25
- Final decrease: Round 33
- Eye placement: 9 stitches apart
This pattern is for intermediate crocheters. It uses worsted weight yarn and a 3.25 mm hook. Your Pikachu will be about 15 cm tall. Happy crocheting!
Assembly and Finishing Touches

It’s time to put together your crochet Pikachu and finish your amigurumi Pokemon! Start by stuffing each part firmly. Use small amounts of fiberfill, adding gradually to ensure even distribution. This step is key for the perfect shape and squishiness.
Next, let’s attach all the pieces. Sew the head to the body between rounds 1-3. Place the arms 6 stitches apart on the belly side, between rounds 1-3. For the legs, put them 6 stitches apart between rounds 11-13. Secure the ears on rounds 3-5 of the head.
To finish your amigurumi Pokemon, add Pikachu’s signature features. Attach the safety eyes on round 10 and embroider the nose on round 11. Don’t forget the iconic red cheeks! Lastly, sew on the lightning bolt-shaped tail, making sure it’s sturdy and well-positioned.
Remember to bury all yarn tails inside the body for a clean finish. Take a step back and admire your adorable, huggable Pikachu! With these finishing touches, you’ve successfully completed your crochet project.
Customizing Your Pikachu’s Size
Do you want a tiny Pikachu keychain or a big cuddly friend? You can change your crochet pattern to fit your needs. Just adjust the yarn weight and hook size to change the size of your Pikachu. This way, you keep Pikachu’s cute look.
Yarn Weight Adjustments
Changing yarn weight is easy to resize your crochet. For a smaller Pikachu, pick a lighter yarn. For a bigger one, choose a heavier yarn. A standard Pikachu is about 3.5 inches tall and long with worsted weight yarn.
Hook Size Modifications
Hook size is key for resizing your Pokemon amigurumi. Common sizes are 3.5mm (E) and 2.5mm (B). A smaller hook makes a tighter stitch and a smaller size. A larger hook makes a bigger Pikachu. Remember, changing hook size changes the stitch density, so adjust the stuffing.
By mixing yarn weights and hook sizes, you can make different Pikachu sizes. For a small Pikachu, use a light yarn with a small hook. For a big Pikachu, use a heavy yarn with a large hook. This way, you can make a Pikachu that’s just right for you.
Troubleshooting Common Issues
Crochet troubleshooting is key when making your Pikachu. Even pros face problems, but we’ve got fixes. You can make a perfect Pokémon friend.
Fixing Uneven Stitches
Uneven stitches can mess up your Pikachu’s look. Keep your tension even to avoid this. Practice helps a lot!
If you spot uneven spots, fix them by stretching or compressing the stitches. This will even them out before you move on.
Adjusting Tension Problems
Tension problems can change your Pikachu’s shape and size. If your work feels too tight or loose, adjust your grip. Use a Medium/Worsted (Weight 4) yarn as recommended.
Try different hook sizes to match your crocheting style. This will help you find the right fit.
Shape Correction Tips
Shaping is key for Pikachu’s look. If you’re having trouble with round shapes, check your stitch counts. The head should have up to 48 stitches at its widest.
The body should have a max of 52 stitches. Count your stitches often to catch and fix mistakes early.
Don’t worry if Pikachu’s ears or tail seem off. These parts can be tricky. For the tail, start with 42 stitches and decrease to 8 by the end.
Take your time and use stitch markers to keep track. With patience and these tips, you’ll crochet Pikachu like a pro!
Tips for Perfect Stuffing and Shaping
Mastering stuffing and shaping is key to making a huggable Pikachu amigurumi. The right techniques help your crochet Pokemon look like the real thing. It should be soft and cuddly too. Here are some expert tips to help you stuff and shape your crochet Pokemon like a pro.
Begin by adding small amounts of stuffing at a time. This lets you control how firm each part is. Pikachu’s head and body should be firm but soft. The limbs and tail need less stuffing to stay flexible.
For small areas like ears or cheeks, use a chopstick or crochet hook. This helps get the stuffing into tight spots evenly. Stuff Pikachu’s body as you crochet, adjusting the amount to get a perfect round shape.
To shape Pikachu’s features, focus on where you place your stitches. Pikachu’s ears and tail need careful shaping. Use stitch markers to mark where to increase or decrease stitches for accurate shaping.
- Stuff firmly for stability, but avoid overstuffing
- Use small tools for hard-to-reach areas
- Shape as you go for best results
- Adjust stuffing density for different body parts
Remember, practice makes perfect. With these tips, you’ll soon be making adorable, well-shaped Pikachu amigurumi. They’ll look great and be irresistibly huggable.
Color Changes and Stripe Placement
Learning how to change colors is key to making a real Pikachu. The stripes of the iconic Pokémon need to be placed just right and change colors smoothly. Let’s explore the methods that will make your Pikachu come to life!
To get Pikachu’s brown stripes, you’ll use yellow for the body and brown for the stripes. The top stripe is 10 stitches wide in round 23. The bottom stripe is 13 stitches wide in round 26. This exact placement makes your Pikachu look just like the character we all know and love.
When you switch colors, join the new yarn at the end of the last round. Start the new round with the new color, leaving a tail to weave in later. This method makes the color changes look clean. Don’t forget to keep the unused yarn inside your work to avoid loose ends.
| Stripe Location | Stitches | Round |
|---|---|---|
| Upper Stripe | 10 | 23 |
| Lower Stripe | 13 | 26 |
To keep your Pikachu looking perfect, weave in your ends as you go. This is very important for the stripes, as it keeps the yellow body smooth. With these steps, your Pikachu will have its classic look down pat!
Care Instructions for Your Finished Pikachu
Your crocheted Pikachu is about 6.5 inches tall and ready for fun! To keep your crochet toy in great shape, follow these easy steps. For quick clean-ups, use a damp cloth with mild soap. Gently wipe the dirty spot, being careful not to rub too hard.
If your Pikachu needs a full wash, put it in a mesh laundry bag. Wash it in cold water with a small amount of mild detergent. After washing, shape your Pikachu back to its original form and let it air dry. Never use a dryer, as it can damage the yarn and stuffing.
To keep your amigurumi Pokemon looking good, store it in a cool, dry place away from sunlight. Dust it often with a soft brush or compressed air. Remember, gentle play keeps your Pikachu looking its best. By following these care tips, your crocheted Pikachu will be a beloved part of your collection for many years.