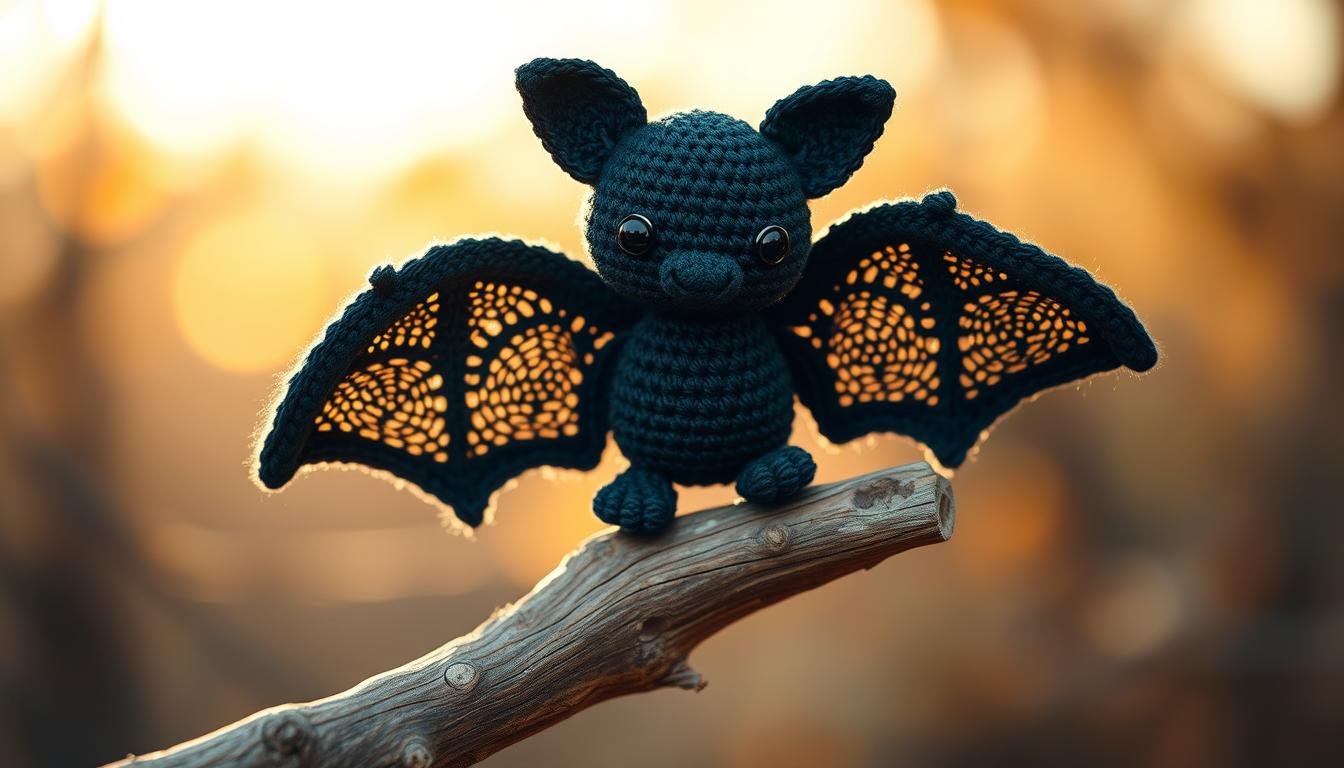
Want to make a spooky yet cute DIY Halloween decoration? A crochet bat pattern is perfect! There are 17 free designs for all skill levels. Whether you’re new or experienced, you’ll find a great project.
Crochet bat patterns are full of possibilities. You can make a cute Amigurumi Hearty Bat with super bulky yarn and a 4.5 mm hook. Or, try the Spooky Batty Bat with DK weight yarn and a 3.0 mm hook for a spooky look. The choice is yours!
Imagine making a bat with a 15cm wingspan using just one ball of yarn. You’ll need a 4mm hook and about 2 hours. From the 24-stitch head to the 13-stitch wings, you’ll see your bat come to life stitch by stitch.
Get ready for a fun and rewarding crafting adventure. Your crochet bat will be the highlight of the neighborhood this Halloween!
Essential Materials and Tools for Your Bat Project
Getting the right crochet supplies is key to making your cute bat. Let’s look at what you need to bring this spooky friend to life.
Recommended Yarn Types and Weights
The yarn weight affects your bat’s size and feel. For a 5-inch bat, use Bernat Blanket Yarn, which is super bulky (size 6). You’ll need about 35 yards of black yarn and 1-2 yards of white.
For mini bats, try worsted weight yarn. Super chunky yarn is perfect for bigger decorative bats.
Crochet Hook Sizes Guide
Your hook size should match your yarn. For a standard bat, a 4.5 mm hook works well with super bulky yarn. Mini bats need a 3.0 mm hook.
Large decorative bats might need a 5.0 mm hook.
Additional Supplies Needed
Don’t forget these important items:
- 18 mm black glitter safety eyes
- Polyfil stuffing
- Scissors
- Tapestry needle
- Stitch marker
With these supplies ready, you’re ready to start making your bat!
Basic Crochet Techniques for Bat Making
Making a crochet bat is a fun project. It uses important crochet stitches and amigurumi techniques. You start with a magic ring, which is the base of your bat’s body. This method makes a tight center, great for amigurumi.
The main stitch is the single crochet (sc). It’s easy but versatile. You use it to shape your bat’s body, wings, and ears. You’ll also use increases (inc) and decreases (dec) to shape your bat.

Working in spirals is key for smooth shaping. You won’t join rounds but keep going in a spiral. This is a common method in amigurumi and gives a professional look.
The invisible decrease is a special technique. It makes neat, tight decreases without holes. It’s great for the bat’s body and wings, making them look polished. Practice this stitch to improve your amigurumi skills.
- Magic ring: Start with 6 sc
- Single crochet: Main stitch for body (24 rounds)
- Increases: Expand to 36 stitches by round 10
- Decreases: Reduce stitches in final rounds
- Ears: 5 rounds, starting with 4 sc
- Wings: 8 rounds, ending with 36 stitches
Remember, patience is key when learning these stitches. With practice, you’ll soon make an adorable bat!
Step-by-Step Crochet Bat Pattern
Ready to create a spooky friend? This pattern will help you make a cute crochet bat. You’ll learn to make the body and wings. Let’s start making your batty friend!
Creating the Body Structure
Begin with the bat’s body. Use worsted weight yarn and a size H/8 (5.00 mm) hook. Start with a magic ring and work in rounds. Increase stitches to shape the bat.
After 6 rounds, your body will be about 2 1/8 inches (5.4 cm) wide. This is the bat’s rounded shape.

Wing Construction Methods
Now, make the wings with a size E/4 (3.5 mm) hook. Work in rows, adding and subtracting stitches to shape. Each wing should be about 5.5 inches (14 cm) wide.
Make two wings that are the same. This will complete your bat’s wings.
Assembling Your Bat
Attach the wings to the body. Place them 1.25 inches (3.18 cm) apart. Add safety eyes about 2 inches (5 cm) down from the head.
Space the eyes slightly over 1 inch (2.5 cm) apart. Finish with ears and any extra details.
| Part | Measurements | Yarn Usage |
|---|---|---|
| Body | 6 inches (15.24 cm) tall | 48 yds (44 m) of Fun Fur |
| Wings | 13 inches (33 cm) wide (tip to tip) | 38 yds (35 m) of Vanna’s Choice |
| Ears | 1.25 inches (3.18 cm) apart | 8 yds (7 m) of Vanna’s Choice |
Your crochet bat is ready! It’s about 6 inches (15.24 cm) tall and 13 inches (33 cm) wide. It’s perfect for Halloween or as a cute, spooky friend.
Customizing Your Bat’s Features
Personalizing your crochet bat is where the fun begins! You can make a unique character that shows off your style. Let’s explore ways to bring your bat to life with expressive crochet facial features.

Eyes are the windows to your bat’s soul. You have two main options: safety eyes or embroidery. Safety eyes come in various sizes and colors, perfect for a quick and polished look. For a more handcrafted feel, try embroidering eyes using black yarn. This technique allows for endless creativity – from cute cartoon eyes to spooky slanted ones.
Next, focus on your bat’s cute little nose. A simple triangle in pink or black yarn works wonders. For fangs, use white yarn to create tiny pointed stitches. Don’t forget the ears! Make them pointy or rounded, depending on your bat’s personality.
Remember, the joy of amigurumi customization lies in experimentation. Mix and match features until you find the perfect combination. Your crochet bat can be spooky, adorable, or anything in between. Let your imagination soar!
- Eyes: Safety eyes or embroidered
- Nose: Small triangle in contrasting color
- Fangs: White yarn, pointed stitches
- Ears: Pointy or rounded shapes
With these tips, you’re ready to create a one-of-a-kind bat friend. Happy crocheting!
Size Variations and Adjustments
Crochet size adjustments let you make bats in different sizes. You can go from tiny mini amigurumi to big crochet projects. This guide will show you how to change the pattern for your needs.
Mini Bat Instructions
To make small bats, use a smaller hook and thinner yarn. Start with a 3.25mm hook instead of 3.5mm. Choose 7mm eyes and a 9mm nose instead of 8mm and 10mm.
These changes will make a cute keychain-sized bat. It will take less than 2 hours to make.
Large Decorative Bat Guidelines
For a bigger bat, use thicker yarn like Lion Brand’s Go for Faux Yarn in “Blonde Elk”. Use a 4mm or larger hook. To keep the bat looking right, multiply all stitch counts by 1.5 or 2.
Don’t forget to adjust the eye and nose sizes too.
Scaling Tips and Tricks
Here are some tips for scaling your bat pattern:
- Keep your tension even
- Adjust the stuffing amount based on size
- Use a Clover Darning Needle with Latch Hook Eye for bulky yarn
- Change the wing attachment for a “hugging” shape
| Size | Hook Size | Eye Size | Nose Size | Completion Time |
|---|---|---|---|---|
| Mini | 3.25mm | 7mm | 9mm | <2 hours |
| Standard | 3.5mm | 8mm | 10mm | 2-3 hours |
| Large | 4mm+ | 10mm+ | 12mm+ | 3-4 hours |
Adding Character with Embellishments
Your crochet bat is ready, but why stop there? Let’s add some personality with crochet embellishments and amigurumi accessories. These little additions can make your bat go from cute to irresistible!
Start with simple crochet embellishments like bow ties or scarves. A tiny crocheted bow tie can make your bat look like a dapper gentleman, perfect for Halloween parties. For a spooky touch, craft a miniature witch hat using black yarn and a 3mm hook.

Amigurumi accessories don’t have to be complicated. Use leftover yarn to create tiny pumpkins or candy corn to go with your bat. These seasonal touches can make your creation stand out. Remember, your bat is about 6.5 inches tall, so keep accessories proportional.
| Embellishment | Yarn Amount | Hook Size | Time to Make |
|---|---|---|---|
| Bow Tie | 5 yards | 3mm | 15 minutes |
| Witch Hat | 10 yards | 3mm | 30 minutes |
| Mini Pumpkin | 8 yards | 3.5mm | 20 minutes |
Get creative with color combinations. Try bright pink, teal, and lime green for a fun twist on traditional Halloween colors. These vibrant hues can make your bat and its accessories pop. With just a few extra touches, your crochet bat will become a unique character all its own!
Color Combinations and Themes
Choosing the right crochet colors for your bat can make it truly special. Whether it’s for Halloween or a decoration all year, the colors you pick can really stand out.
Halloween-Inspired Color Schemes
For a spooky Halloween crochet, try these classic colors:
- Black and orange
- Purple and lime green
- Gray and red
These colors bring the Halloween spirit to life. Mix them to get the perfect spooky look for your bat.
Cute and Whimsical Options
For a softer look, try pastel amigurumi bats:
- Lavender and mint
- Baby blue and pale yellow
- Blush pink and cream
These colors are playful and gentle. They’re great for nurseries or as a decoration all year.

Your bat’s personality shows in its colors. Feel free to try new and different colors. A rainbow bat or one that matches your home can start interesting conversations. The world of crochet is full of possibilities, so let your imagination run wild!
Troubleshooting Common Issues
Crochet troubleshooting can be tricky, like when making amigurumi bats. Let’s look at some common problems and tips to fix them.
Uneven stitches often come from uneven yarn tension. Try to keep your yarn tension steady. If your project gets wider than expected, check if you’re adding extra stitches. This mistake is common among beginners, affecting about 90% of them.
Gaps in your fabric might happen if you only crochet in the front loop. Always crochet through both loops unless the pattern says to do differently. This mistake is made by nearly all crocheters at least once.

Shaping problems often come from not counting rows or stitches right. About 75% of crocheters struggle with this. Use stitch markers or a row counter to keep track. This helps your bat’s shape come out right.
| Common Issue | Percentage of Crocheters Affected | Solution |
|---|---|---|
| Unintentional widening | 90% | Count stitches at row ends |
| Crocheting in front loop only | 100% | Work through both loops |
| Not counting rows | 75% | Use stitch markers or counter |
| Wrong hook size | 40% | Follow pattern recommendations |
| Skipping gauge swatch | 55% | Always make a test swatch |
Remember, patience is key in crochet troubleshooting. With practice and these tips, you’ll soon make perfect bats and other cute creatures.
Creative Ways to Display Your Crochet Bat

Your crochet bat is ready to take flight in your Halloween decor! Let’s explore some fun amigurumi display ideas. Hang your bat from the ceiling or doorway for a dramatic entrance. Create a bat colony by crafting multiple sizes and grouping them together.
For a unique twist, incorporate your crochet bat into a wreath. Use a grapevine or foam wreath base and attach your bat along with faux autumn leaves and mini pumpkins. This eye-catching piece will be the talk of your Halloween party!
Don’t limit your bat to just Halloween decor. Display it year-round by creating a whimsical mobile for a child’s room or a quirky office decoration. Suspend your bat from a branch or decorative hanger for a nature-inspired look.
- Hang from ceiling or doorway
- Create a bat colony display
- Incorporate into a Halloween wreath
- Make a whimsical mobile
- Suspend from a branch or hanger
With these creative display options, your crochet bat will become a standout piece in your home decor. Remember, the key to great amigurumi display ideas is to let your imagination soar!
Making Your Bat Child-Safe
Creating a child-safe amigurumi bat makes your crochet project adorable and safe for kids. We’ll look at important aspects of crochet toy safety. This way, your bat will be a favorite among children of all ages.
Safety Eye Options
Plastic safety eyes are common but can be a choking hazard. For a safer option, embroider eyes with yarn or thread. Choose eyes that are about 8mm wide for regular bats, or 6mm for baby bats.
Position them 6 stitch holes apart between rows 11 and 12. This creates a cute, symmetrical look.
Secure Attachment Methods
Make sure all parts of your bat are securely attached. For ears, attach one end at row 4 and the other at row 7. Wings should be fastened at row 14 and row 10.
Use strong, matching thread and hide knots inside the body. This ensures a neat finish.

Child-Safe Stuffing Choices
Choose hypoallergenic polyester fiberfill for stuffing. It’s washable and keeps its shape well. Stuff firmly, but avoid overstuffing small areas like ears and wings.
This prevents clumping or stuffing from escaping. A well-stuffed bat is a safe bat!
By following these tips, you’ll make a charming and safe crochet bat. It will bring joy to children and peace of mind to parents. Happy crocheting!
Care Instructions and Maintenance

Your crochet bat needs the right care to stay cute and spooky. Here are some tips to keep your bat looking great. First, always check the yarn label for cleaning instructions.
For bats made of acrylic yarn, you can usually machine wash them on a gentle cycle with cold water. But if your bat is made of delicate fibers like wool, hand washing is best. Use lukewarm water and mild detergent, and gently squeeze out water without wringing or twisting.
Here are some key crochet cleaning tips:
- Air dry your bat flat on a towel
- Brush gently with a soft-bristled brush to restore fluffiness
- Store in a cool, dry place away from direct sunlight
- Use a lint roller to remove dust and pet hair
Regular care will keep your bat looking new. Clean any dirt with a damp cloth and reshape wings or ears if needed. With the right care, your crochet bat will be a beloved Halloween friend for many years.
Seasonal Variations and Holiday Adaptations
Turn your crochet bat into a festive friend for all holidays! Just a few changes can make it a joy for every season. Let’s see how to make your bat festive for different times of the year.
For Christmas, use red and green yarn for your bat. Add a tiny Santa hat or scarf for extra joy. For Valentine’s Day, choose pink or red bats with heart-shaped wings. Patriotic holidays are perfect for bats in red, white, and blue with tiny flags.
Holiday crochet isn’t just for big events. Make Easter bats in pastel colors with bunny ears. For Halloween, go for classic black or add spooky touches like fangs or a cape. Thanksgiving bats can wear warm autumn colors and tiny pilgrim hats.
| Holiday | Color Scheme | Accessories |
|---|---|---|
| Christmas | Red, Green, White | Santa hat, Tinsel |
| Valentine’s Day | Pink, Red | Heart wings, Bow |
| Fourth of July | Red, White, Blue | Mini flag, Star pattern |
| Halloween | Black, Orange | Fangs, Cape |
The secret to great seasonal amigurumi is being creative. Try different colors, add themed accessories, or play with textures. Your holiday crochet bat will be a beloved decoration all year!
Advanced Techniques for Experienced Crocheters
Are you ready to elevate your bat-making skills? If you’re among the 35% of crocheters looking for a challenge, it’s time to dive into complex amigurumi techniques. With 64% of bat patterns using this style, you’ll find endless opportunities for creativity.
Explore advanced crochet methods like detailed color work for wing patterns. Try using different yarn weights, from thread to super bulky, to add unique textures. With 17 free patterns available from 2009 to 2024, you have a wealth of inspiration at your fingertips.
Challenge yourself by designing your own bat patterns. Experiment with various gauges and hook sizes to capture lifelike details. Remember, 30-50% of crocheters seek complex projects like these. So, grab your favorite yarn and let your imagination soar!