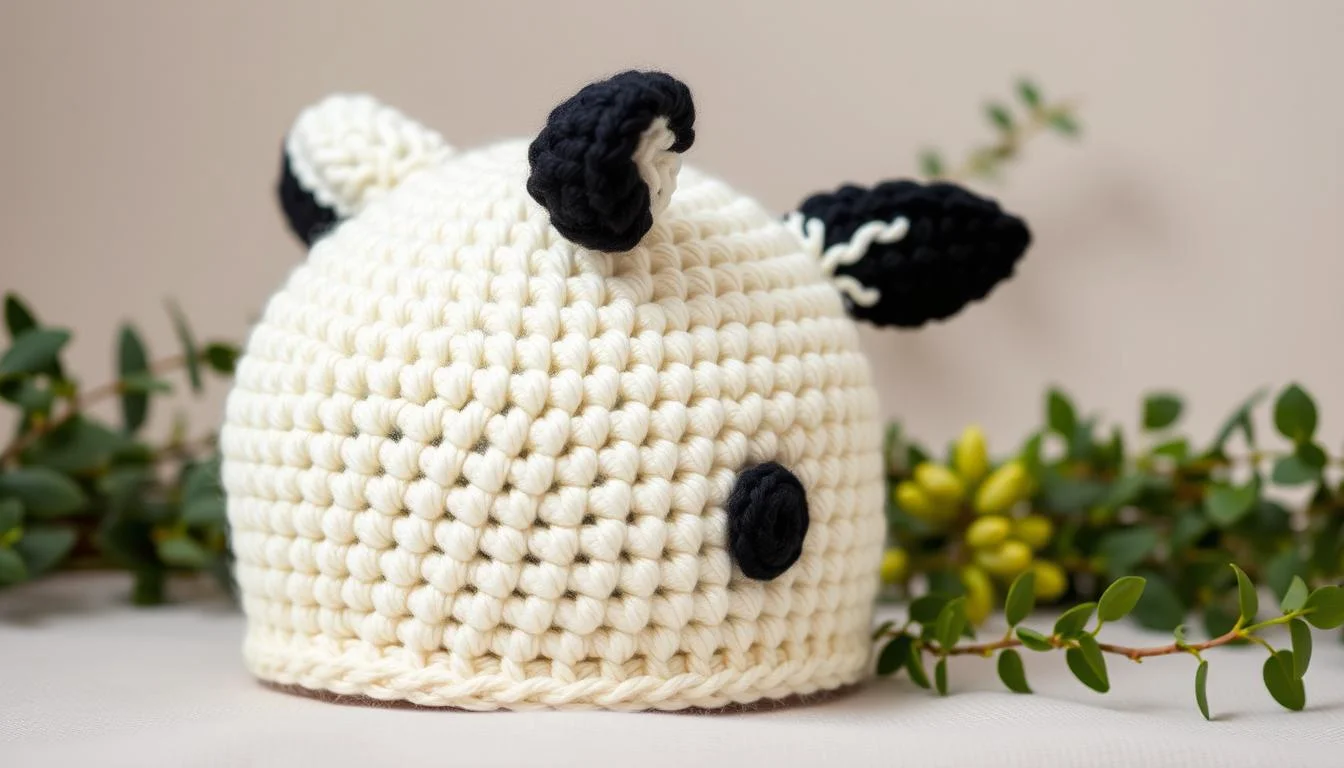
Are you ready to make a cute DIY cow hat? This pattern is great for all skill levels. It’s perfect for making a fun accessory that everyone will love.
Our guide will teach you everything about making a crochet cow hat. You’ll learn about materials and essential stitches. Plus, we have sizes for everyone, from babies to adults.
This pattern has sizes for all, with diameters from 5 to 7 inches and circumferences from 14 to 23 inches. You’ll learn to make the hat’s base, add cow spots, and details like ears and horns.
Get ready for a fun crochet project that’s both creative and practical. By the end, you’ll know how to make a cozy cow-themed hat for yourself or as a gift.
Essential Materials and Tools for Your Cow Hat
Ready to start your crochet cow hat project? We’ve got everything you need to make this adorable accessory. You’ll need the right yarn and crochet tools to get started.
Yarn Selection and Colors
To get the cow look right, you’ll need three colors of worsted weight yarn:
- Black for the spots and details
- White for the base color
- Tan for the ears and snout
Look for soft, durable yarn that’s easy to crochet with. Acrylic or cotton blends are great choices.
Required Crochet Hooks
You’ll need two hook sizes for this pattern:
- Size I-9 (5.5 mm) for the main body of the hat
- Size H-8 (5 mm) for smaller details and tighter stitches
Additional Supplies Needed
To finish your crochet cow hat, you’ll need these tools:
- Yarn needle for weaving in ends
- Scissors for trimming yarn
- Stitch markers to keep track of rounds
- Tape measure for sizing
With these supplies, you’re ready to start your cow hat project. The right tools can really improve your finished hat. Happy crocheting!
Size Guide and Measurements
Finding the right crochet hat sizes is key for a comfy and adorable cow hat. Our detailed size chart covers sizes from tiny newborns to adults. This ensures a perfect fit for everyone.
Baby to Adult Size Chart
Use this handy size chart to find the ideal hat measurements for your project:
| Age Group | Circumference | Height | Crown Diameter |
|---|---|---|---|
| Newborn (0-3 months) | 13 inches | 6 inches | 4 inches |
| Baby (3-6 months) | 14 inches | 6.5 inches | 4.5 inches |
| Toddler (1-3 years) | 18 inches | 7 inches | 5.5 inches |
| Child (3-10 years) | 20 inches | 7.5 inches | 6 inches |
| Adult | 22 inches | 8 inches | 7 inches |
Head Circumference Guidelines
To measure head circumference, wrap a flexible tape measure around the widest part of the head. This is just above the ears. This measurement will guide you to the right size chart for your crochet cow hat.

Height and Crown Measurements
Hat height is measured from the brim to the top of the crown. The crown diameter affects the hat’s shape and fit. Adjust these measurements as needed to create the perfect cow hat for any size head.
Remember, these measurements are just a starting point. You might need to make slight adjustments based on individual preferences or yarn thickness. This will help you achieve the best fit for your crochet cow hat.
Crochet Cow Hat Pattern Basics
Let’s explore the basics for your cute cow hat. This pattern is great for beginners. It uses simple stitches in rounds.
You’ll work with worsted weight yarn in white and black. You can add an optional accent color for extra style.
The hat starts with a magic circle. It grows by adding more rounds. You’ll start with 11 double crochets (dc) in the first round.
By the fifth round, you’ll have 55 dc stitches. Aim for a length of about 7 inches. Adjust as needed for the perfect fit.

For the cute details, single crochet (sc) stitches are used. The eye needs 25 sc by the fifth round. Each ear requires 16 sc.
The muzzle starts with a chain of 27. This creates 26 half double crochets (hdc) across the first row. By the sixth round, it decreases to 12 stitches.
Remember, controlling your tension is important. Use stitch markers to keep track. Making a gauge swatch helps ensure the right size. With these basics, you’re set to make a charming cow hat!
Understanding Gauge and Tension
Mastering crochet gauge and tension is key to creating a perfect cow hat. Your crochet gauge affects the size and fit of your project. Let’s dive into the essentials of gauge swatches and tension tips to ensure your cow hat turns out just right.
Gauge Swatch Instructions
A gauge swatch is a small sample that helps you match the pattern’s tension. To make one, use the yarn and hook size specified in the pattern. Crochet a 4-inch square, then count the stitches and rows. Compare your results to the pattern’s gauge.
| Measurement | Pattern Gauge | Your Gauge |
|---|---|---|
| Stitches per 4 inches | 15 | [Your count] |
| Rows per 4 inches | 9 | [Your count] |
Tension Tips for Perfect Results
Maintaining consistent tension in crochet is key for a polished look. Here are some tips to improve your tension:
- Hold your yarn with a relaxed grip
- Keep your stitches neither too tight nor too loose
- Take breaks to avoid hand fatigue
- Use stitch markers to maintain even spacing
Remember, achieving the right crochet gauge might take practice. Don’t hesitate to adjust your hook size or technique until your gauge swatch matches the pattern. With these skills, you’ll create a cow hat that fits perfectly and looks amazing!

Essential Crochet Stitches and Terms
Learning basic crochet skills is essential for making your cute cow hat. We’ll cover the key stitches and terms you need. Knowing these basics will make you more confident as you follow the pattern.

The five main stitches for beginners are the chain stitch, single crochet, half double crochet, double crochet, and slip stitch. Single crochet is a staple and the base for many projects. Half double crochet adds height, and double crochet is great for different items. Slip stitch is the shortest and best for joining and finishing edges.
Common crochet terms include:
- ch: chain
- sc: single crochet
- hdc: half double crochet
- dc: double crochet
- sl st: slip stitch
- st: stitch
For beginners, using larger hooks (4mm or 5mm) helps. Affordable yarns like Hobbii Cotton Yarn are perfect for practice. As you get better with these stitches and terms, you’ll be ready for more complex patterns. You’ll also be able to create different textures in your projects.
Creating the Hat Base Structure
Let’s start making your crochet hat base. This part covers the magic circle crochet, crown increases, and body rounds. You’ll build a strong base for your cow hat, no matter the size.
Magic Circle Technique
Begin with a magic circle for your hat crown. This method makes a tight center, avoiding gaps. Wrap yarn around your fingers, insert hook, yarn over, and pull through. Then, work your first round of stitches into this circle.
Crown Increases
Shape the hat’s top with crown increases. Add stitches in each round to make a flat circle. The number of increases depends on your chosen size:
| Size | Head Circumference | Increases per Round |
|---|---|---|
| S (Toddler) | 16-18 inches | 6 |
| M (Child) | 18-20 inches | 6 |
| L (Adult) | 20-22 inches | 6 |
| XL (Larger Adult) | 22-24 inches | 6 |
Body Rounds
After your crown is the right size, stop increasing and do even rounds for the body. The number of rounds changes with size. Use stitch markers to keep track. Remember, seven rounds should measure 3 inches across for the right gauge.

For a custom fit, adjust the brim length. Sizes S and M have a 2.5-inch brim, while L and XL have a 3-inch brim. Your crochet hat base is now ready for the fun cow-themed additions!
Crafting the Signature Cow Spots
Ready to make your crochet cow hat come to life? Let’s create those iconic spots that make your hat unmistakably bovine. The cow spot pattern is a key element in color work crochet, adding charm and character to your creation.
Spot Placement Guide
For a realistic look, place spots asymmetrically on your hat. Aim for 3-5 larger spots on each side, varying in size and shape. Remember, no two cows are alike, so feel free to get creative!
Color Change Techniques
Mastering crochet color change is key for seamless spots. To switch colors, work the last stitch of your current color until two loops remain on the hook. Then, yarn over with your new color and pull through both loops. This technique ensures clean transitions between your base color and spots.
| Technique | Best For | Difficulty |
|---|---|---|
| Tapestry Crochet | Intricate patterns | Intermediate |
| Intarsia | Large color blocks | Advanced |
| Fair Isle | Small, repeating patterns | Intermediate |
Practice these color work crochet methods to perfect your cow spots. With patience and persistence, you’ll create a unique and adorable cow hat that’s sure to turn heads!
Making and Attaching Cow Ears
Creating crochet cow ears is a fun part of your cow hat project. These 3D elements add charm and character. Let’s explore how to make and attach these adorable ears.
First, pick your yarn colors. Use black and white for a realistic look. Each ear needs about 1/4 oz of each color. Start with a magic circle of 6 stitches using a G-4 hook. Then, increase to 16 stitches over several rounds, shaping the ear.

When attaching ears, where you place them matters. Put them 2 inches apart on the hat’s sides, angled outward. Use a tapestry needle and matching yarn to secure them firmly. This ensures they last through wear and tear.
| Ear Feature | Details |
|---|---|
| Starting Stitches | 6 in magic circle |
| Widest Point | 16 stitches |
| Yarn Colors | Black and white |
| Hook Size | G-4 |
| Attachment Distance | 2 inches apart |
Remember, making 3D elements takes practice. Don’t worry if your first try isn’t perfect. With patience, you’ll get the hang of crocheting and attaching these cute cow ears to your hat.
Shaping the Cow Snout
Making a crochet cow snout is a fun part of your cow hat project. It adds a 3D shape that brings your hat to life. Let’s explore how to make this cute detail.
Nostril Details
Begin by crocheting the main snout shape with tan yarn. Use rounds to make a small, oval shape. Then, switch to black yarn for the nostrils. Make two small circles and attach them to the tan base, side by side.
Snout Assembly Steps
To put your crochet cow snout together, follow these steps:
- Lightly stuff the tan base for a 3D effect
- Sew the black nostril circles onto the tan base
- Create a small indent between the nostrils using a running stitch
- Securely attach the completed snout to your hat

The snout is a key embellishment that makes your cow hat unique. Take your time to shape it well. With practice, you’ll soon make adorable cow snouts!
Adding Decorative Elements
Give your cow hat personality with crochet embellishments! Let’s explore how to create expressive eyes and charming horns that’ll make your creation stand out.
Eyes and Expression
Amigurumi eyes bring your cow hat to life. Use black yarn for the main eye, adding a small white highlight for a sparkle. Place them 10 stitches apart for the perfect cow-like look. You can also use safety eyes for a quick and easy option.

Horn Creation
Crochet horns add a fun touch to your cow hat. Start with a magic ring using 6 single crochet stitches. Increase for 2 rounds, then work even for 3 rounds. Decrease to form the point. Make two horns and attach them securely to the hat’s sides.
Remember, these crochet embellishments allow for creativity. You can adjust the size of the eyes or shape of the horns to suit your style. Whether you’re going for cute or quirky, these finishing touches will make your cow hat truly unique!
Earflap Instructions
Want to make your crochet cow hat warmer for winter? Let’s add earflaps! These earflaps add warmth and a fun touch. They’re great for all ages, from babies to adults, keeping everyone cozy and stylish.

You’ll need a 6 mm (J) hook for the hat and a 4 mm (G) hook for the earflaps. The pattern is for an adult size, but it fits all ages. It’s perfect for newborns to grown-ups!
For the earflaps, crochet in rows of double crochet. Aim for 4 rows and 7 stitches in a 2-inch square. This ensures they fit well with the hat.
- Position the earflaps on either side of the hat, about 2 inches above the brim
- Crochet the flaps directly onto the hat using the smaller hook
- Work in decreasing rows to create a tapered shape
- Add braided ties for an extra cute finish
You can adjust the earflaps’ size for different hat sizes. For baby hats, use Bernat yarn for smaller, softer earflaps. These earflaps are a wonderful addition to winter hats, making great gifts for baby showers or cold weather.
Pattern Modifications for Different Sizes
Crochet pattern adjustments are key to creating the perfect cow hat for everyone in your family. Resizing crochet patterns allows you to craft adorable hats for babies and sturdy ones for adults. Let’s explore how to make custom crochet sizes that fit just right.
Baby Sizing Adjustments
When crafting for little ones, softness and comfort are key. Use DK yarn in white, pink, and blue for a gentle texture. For newborns, start with a smaller magic circle and fewer increase rounds.
Adjust the hat’s height by reducing body rounds. Remember to scale down decorative elements like ears and spots for a proportionate look.
Adult Size Modifications
For adult sizes, focus on creating a well-fitting, durable hat. Increase the initial stitch count in your magic circle and add more increase rounds to achieve the right circumference. Lengthen the body by working additional straight rounds.
Enlarge the cow spots and ears to maintain the cute design at a larger scale.
Keep in mind that gauge is key when resizing crochet patterns. Always make a gauge swatch before starting your project to ensure accurate sizing. With these tips, you’ll master the art of custom crochet sizes, creating perfect cow hats for everyone from babies to adults!
Finishing Touches and Assembly
You’re almost done with your crochet cow hat! First, use a tapestry needle to weave in loose ends. This makes your hat look neat and keeps it together.
When you put your hat together, where you place things matters. Arrange the hat base, spots, ears, and snout before you start. This helps you get the cow look right. Use a whip stitch to attach each part, starting with the big spots and moving to the small details.
Now, add the special touches that make your cow stand out. You can sew on safety eyes or embroider them with black yarn. Make a smile with a few stitches under the snout. Fluff the ears and adjust anything that needs fixing.
| Component | Attachment Method | Time (approx.) |
|---|---|---|
| Spots | Whip stitch | 15-20 minutes |
| Ears | Sew or slip stitch | 10 minutes |
| Snout | Whip stitch | 5-10 minutes |
| Eyes | Safety eyes or embroidery | 5-15 minutes |
With these steps done, your crochet cow hat is ready to wear! The effort you put into it will make it a favorite for years.
Care Instructions and Storage Tips
Your crochet cow hat needs the right care to stay cute and warm. Wash it in cool water with mild soap. Don’t wring it out too hard. Instead, lay it flat to dry, reshaping it if needed.
When washing your crochet hat, stay away from harsh detergents and hot water. They can harm the fibers and make colors fade. For tough stains, gently clean them with a soft brush. Always check the yarn label for special care tips.
Proper storage is vital for your handmade hat’s longevity. Store it in a cool, dry spot, away from sunlight. Use a hat box or fill it with acid-free tissue paper to keep its shape. This way, your hat stays dust-free and ready for its next use. Follow these tips to enjoy your crochet cow hat for many years.